步骤1:双击MySQL安装程序
官方网站http://dev.mysql.com/downloads/下载该软件
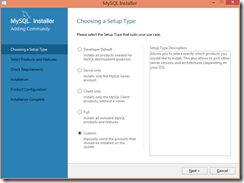
步骤2:“Install MySQL Products” 文字,会弹出的用户许可证协议窗口,安装类型设置窗口,安装类型界面各设置项含义:
Developer Default 默认安装类型
Server only 仅作为服务器
Client only 仅作为客户端
Full 完全安装类型
Custom 用户自定义安装类型
根据自己的情况选择安装,我们这里以自定义安装为例:
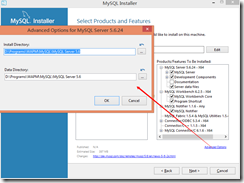
步骤3:选择安装内容及安装目录:
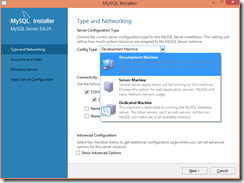
步骤4:选择类型
Developer Machine(开发机器),个人用桌面工作站,占用最少的系统资源
Server Machine(服务器),MySQL服务器可以同其它应用程序一起运行,例如FTP、email和web服务器。MySQL服务器配置成使用适当比例的系统资源。
Dedicated MySQL Server Machine(专用MySQL服务器):该选项代表只运行MySQL服务的服务器。假定运行没有运行其它应用程序。MySQL服务器配置成使用所有可用系统资源。
根据自己情况选择即可,一般WEB服务器选择第二个,Server Machine即可!个人电脑安装选择第一个,Developer Machine比较好。
步骤5:配置密码
对应的界面中,我们需要设置root用户的密码,在“MySQL Root password”(输入新密码)和“Repeat Password”(确认)两个编辑框内输入期望的密码。也可以单击下面的【Add User】按钮另行添加新的用户。(注:Current Root Password:为空;如果输入密码了在后面安装会报错)
步骤6:设置Windows Service Name<可默认>,此名为启动数据库服务名,要记住。
步骤7:验证服务:
在开始菜单栏->附件->右键命令提示符->以管理员身份运行:
net start MySQL56 为启动数据库服务命令;net stop MySQL56 为停止数据库服务命令。步骤8:连接测试:
进入bin目录,执行mysql -u root -p 回车输入密码
D:\>cd D:\Programs\WAPM\MySQL\MySQL Server 5.6\bin
D:\Programs\WAPM\MySQL\MySQL Server 5.6\bin>mysql -u root -p
Enter password: ****** Welcome to the MySQL monitor.  Commands end with ; or \g.
Your MySQL connection id is 1 Server version: 5.6.24-log MySQL Community Server (GPL)

Copyright (c) 2000, 2015, Oracle and/or its affiliates. All rights reserved.

Oracle is a registered trademark of Oracle Corporation and/or its
affiliates. Other names may be trademarks of their respective
owners.

Type 'help;' or '\h' for help. Type '\c' to clear the current input statement.

mysql>


